CARE INSTRUCTIONS
All clocks are unique and handmade from recycled bicycle parts. They will have imperfections, but these are part of their charm and character.
Because the clock is not in a casing, it's fragile (especially the hands), so needs to be handled with care, particularly when setting the time and changing the battery.
It will last you a lifetime if you follow these simple instructions!
STEP 1 - FIT THE BATTERY
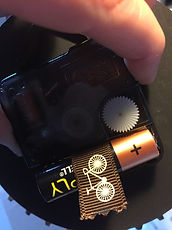
It is best to fit the battery when the hands are set at 12 o'clock (to reduce the chance of damage). Your Ride On Time' Clock is supplied with a battery 'jacket' (it will make changing the battery easier)
1) Slip the battery inside its jacket
2) Place the positive end of the battery into the mechanism first
3) Holding the clock carefully (and making sure you’re not touching the hands), push the battery into place.
STEP 2 - SET THE TIME
Always use the dial on the back to set the time; do not set the time by moving the hands.
STEP 3 - ATTACH THE STAND (IF APPLICABLE)
Slide the ‘point’ of the triangle between the clock mechanism and the wooden backing
REMOVING THE BATTERY
When changing the battery:
1) Set the hands to twelve o'clock.
2) Carefully hold the clock, making sure you're not pressing against the hands.
3) Pull the end of the battery 'jacket'; the battery should pop out.
PRECAUTIONS
-
If you use too much force, the clock movement (black casing) may shift. If this happens, gently move it back into it's correct position.
-
Should you accidentally bend the hands, very gently bend them back. If you try to do this too quickly or with too much force, they may break.
If you have any problems or have any questions, please get in touch!


